Wednesday 30 December 2015
What happened at the borders?
Going into this adventure we had no idea what to expect at borders. Would we have to pay money? Would they check documents? Would they search the car? Here we'll detail our experiences. Also this may not always be true for everyone, we heard stories of other people crossing the same borders who had completely different experiences to us. NOTE: this is a work in progress, I will add more information and details as and when I have time.
Country Entering
|
Border
|
What the law says?
|
Insurance asked for by border guards?
|
Money paid at border?
|
Notes
|
Serbia
|
Horgos (E75)
Hungarian-Serbian
|
3rd party insurance mandatory.
|
No
|
No
|
Crossed solo. Straightforward and easy. No mention of green card. No road tax paid and no tolls paid for use of motorways.
|
Turkey
|
Ipsala (E84)
Greece-Turkey
|
3rd party insurance mandatory. Tolls payable for motorway usage.
|
No
|
No
|
Crossed solo. Straightforward and easy. No mention of green card. No road tax on border. Turkey has toll motorways which are paid automatically using a HGS pass. We didn't get the pass, instead we drove through the toll gates, with alarms going off every time. We were never stopped and we exited Turkey with no mention of all the missed tolls.
|
Georgia
|
Sarpi (E70)
Turkey-Georgia
|
3rd party insurance mandatory.
|
No
|
No
|
Crossed solo. Straightforward and easy. No mention of green card.
|
Armenia
|
Gogavan
Georgia-Armenia
|
3rd party insurance mandatory.
|
No
|
Road tax: 10,700 AMD (aprox £15)
|
Crossed solo. Amounts paid for tax varied across different teams. We heard anything from 15 pounds to 40 pounds. Ours was probably cheaper as we had a random Russian footballer translating and helping us. Cash only, but
you can use other currencies (Turkish Lira, Georgian Lari, USD, Euro
confirmed).
|
Iran
|
Noordoz (M2)
Armenia-Iran |
No
|
Carnet: 600 euro
|
Seven rally cars crossing together. Carnet payment is by cash, no cash points available. Fixers can sort
carnet for varying prices. With hindsight we wouldn't have pre-arranged as there were fixers who would do it for around 250 USD.
|
|
Turkmenistan
|
Bajgiran (Quchan-Bajgiran Road)
Iran-Turkmenistan |
No
|
Road tax: $135
Visa: $97 |
Seven rally cars crossing together. Long process, cash only, no way to get cash either if you are stuck.
Picky about quality of notes. Brits will also have to pay $97 for visa.
|
|
Uzbekistan
|
Farab (M37)
Turkmenistan-Uzbekistan |
No
|
No
|
Three rally cars crossing together. Agents trying to sell insurance certificate after border. Several teams did not bother and were never
asked for proof of insurance
|
|
Tajikistan
|
Tursunzoda (M41) Uzbekistan- Tajikistan
|
No
|
Road tax: $20
|
Four rally cars crossing together. Attempted bribes on exiting the country, with the guard suggesting we didn't have receipts for all manner of things. We ended up bartering down from 100 USD per car to approximately 5 USD for four cars! If we held out for longer it would have been zero.
|
|
Kyrgyzstan
|
(M41)
Tajikistan-Kyrgyzstan |
No
|
Road tax: $20
|
Four rally cars crossing together. Professional (they had computers and passport scanners) and welcoming border. Reports other teams
'lost' items during car search, but we (and 3 other cars) were absolutely fine.
|
|
Kazakhstan
|
Karkara (A362)
Kyrgyzstan-Kazakhstan |
No
|
No
|
Crossed solo. Need to fill out a customs form, makes life easier if you have it
later on (for Russia/Mongolia), but can get away without it. Professional and welcoming border, with the customs guard trying to teach us lots of Kazakh words.
|
|
Russia
|
Kazakhstan-Russia
AND
Mongolia-Russia
|
3rd party insurance mandatory.
|
No
|
No
|
Three rally cars crossing together. Stopped by police 3 times whilst in Russia (all whilst driving back to the UK), no time did they ask for insurance or tax.
|
Mongolia
|
Khyagt (A-340)
Russia-Mongolia |
No
|
Car cleaning: X dollar
|
Crossed with two rally cars. Agents after border peddling tax and insurance, many teams ignored
and drove on without any problems. Other teams paid $x for tax, $x for
insurance.
|
Friday 6 November 2015
Wednesday 10 June 2015
Visas: Russia

This is our first visa application that has required a separate Letter of Invitation (LOI) application. This is a document that invites you to Russia, and is normally issued by travel companies or businesses. This needs to be applied for in advance of your visa application (see step 1). There are several different types of Russian visa available, with two classes being suitable for this trip (tourist or business). Avoid going for an 'auto-tourist' visa, this will create more problems than it is worth. You can also get single, double or multiple (business only) entry visas. In the end we opted for a 90 day business visa. The reason being it gives us a huge amount of flexibility in terms of first entry date, and we are not worrying about rushing back through Russia on our way home. Some quick facts:
- Cost: £170.70 per person (including signed for postage, consular fee, and LOI fee)
- Visa Duration: 90 days
- Number of Entries: Double
- Visa Processing Time: 1 Week
- Place of Application and Nationalities: London and UK Citizens
- Application Date: 27th May 2015 (over 2 months in advance)
So how did we do it? Firstly here is our little check list of things you will need per person:
 Passport Photo 35 mm x 45 mm (x1)
- Printed Application Form (x1)
- Scanned Digital Copy of Passport Main Page (x1)
- Copy of Letter of Invitation (x1)
Step 1 - The Letter of Invitation (LOI)
There are many many many companies offering LOIs for Russia. We chose Real Russia. They have the best reviews, quick processing times, and are very professional in their approach (very quick replies to emails etc). As mentioned the LOI is an invitation to Russia. In reality it is a formality, you pay a company and you get the document emailed to you. Tourist LOIs generally get processed in days, if not minutes. Business LOIs take a little longer, ours took a couple of weeks to process, and there are also various conditions about how quickly you want it processed, and how far in advance. A general rule of thumb, it will cost more the quicker you want it processed, and it will cost more the further in advance you want it doing.


Above is our choice for the LOI. At £57.50 per person it is not cheap, but in comparison to the overall cost of the Russian visa we decided it was worth paying that bit more to give ourselves lots of breathing room. In reality it is only about 30-40 pounds more than a tourist invitation, and removes a lot of worry. Below is a copy of what we put for our itinerary and comments.

Real Russia emailed us to ask what the purpose of our visit was. I told them I was travelling by public transport, visiting places and documenting my travels. They replied and told me that I must say I am travelling for business reasons, should I be asked. I then asked them what these business reasons are, and they responded 'Business reasons are enough'. Real Russia require a scanned copy of your passport with the LOI application. We submitted our application on the 28th April, and received our LOIs on the 18th May.

Once all the documents are processed, you wait. Finally receiving a pdf containing the amazing document seen above.
Step 2 - The Application Form
The next step is to head on over to the VFS Global website to fill in an online form. You need to select the relevant visa type and follow the instructions carefully. The website gives you the chance to save your application as you do it, this is incredibly helpful as you're almost certainly going to get bored of filling out this form and want to come back to it later. Below is the screen you will be faced with, make a note of your application number.

You will encounter a variety of fun questions. A couple of my favourites include 'list all countries you have visited in the last ten years and indicate the year of visit' (basically account for the visa stamps in your passport), and 'do you have any specialized skills, training or experience related to fire-arms and explosives or to nuclear matters, biological or chemical substance? If yes, please specify'!
For the itinerary we chose five cities that we would visit, and I also added the addresses of five (unbooked) hotels in those cities for section 34 about the names and addresses. If you are applying for a business visa the section about the invitation will ask for a TIN number, you can leave this blank. Once you have completed each section you will be given a PDF version of the form, that will fill two sides of A4, you will need to print this off.
Step 3 - Visiting the VFS Global Centre in London
This is an annoying step, more so if you don't live near London. As of December 2014 all British visa applicants are required to have their fingerprints during the application process. You do not need to book an appointment, it is a drop in centre. It can be found near to the Barbican tube station (about 10 minutes walk away).

I read on several places that you can't take bags in with you. This is nonsense. There were plenty of people with backpacks, handbags, and even full on hiking rucksacks. As for things that you need to take with you:

I read on several places that you can't take bags in with you. This is nonsense. There were plenty of people with backpacks, handbags, and even full on hiking rucksacks. As for things that you need to take with you:
- Your completed and printed application form
- A copy of your LOI (B&W print out is fine)
- A passport photo
- Payment
On arrival you will most likely be greeted by a burly Russian man who will indicate that you should take a ticket from the machine. This will have your queue number, and there are Argos style boards telling you when it is your turn and which counter to go to. When your number is called, head to the relevant counter and hand over your documentation. The conversation will be highly limited, it seems the centre is geared up for fast processing. The person at the desk will mainly check dates on forms against LOIs and your passport info. You will then be instructed to place your fingers on the fingerprint scanner. Finally comes the payment time. If you are opting for them to post you passport back for you then you will need to fill out a self-addressed DX delivery envelope (and add an extortionate £9.80 to the bill). The cost of the visa (regardless of visa type) is £103.40 (including VAT).
Step 4 - Sit Back and Wait
One week later we got our passports back with our shiny new visa sticker.
If this guide has been helpful (and saved you many many pounds compared with using a visa service), and you would like to say thank you then feel free to donate a couple of quid to our charity, Anthony Nolan, through our Just Giving link.
Sunday 31 May 2015
In The News: Nottingham Alumni
Both Kate and I are alumni of the University of Nottingham. Therefore we approached the University to see if they were interested in publishing an article about our upcoming trip. We got a very positive response, and here is the incredibly well written piece by Simon Harvey at the Alumni Magazine. Click on the image to be directed to the full article.

Tuesday 19 May 2015
Visas: Kazakhstan

Update 25th October 2015: the Kazakhstan extended the visa free regime for 19 countries, lasting until the end of 2017. Countries include: Australia, Belgium, Finland, France, Germany, Hungary, Italy, Japan, Malaysia, Monaco, Netherlands, Norway, Singapore, Spain, Sweden, Switzerland, the UAE, the U. K. and the U.S. This means passport holders from these countries can enter without having to pre-apply for a visa, and without paying any visa fees.
We finally made the decision to apply for our Kazakhstan visa. We couldn't wait any longer to see if the visa free regime would be extended (due to needing to apply for other visas), so opted to get a 30 day tourist visa. There seems to be some confusion over what is necessary for this visa, some people have read that you need to submit a letter of employment. We didn't bother and still got our visa. We added a copy of our Mongol Rally entry confirmation, mainly because I had a copy on my desk, and also because I feel it gives a bit more credence to our travel plans that are mentioned in the cover letter. Some quick facts:
We finally made the decision to apply for our Kazakhstan visa. We couldn't wait any longer to see if the visa free regime would be extended (due to needing to apply for other visas), so opted to get a 30 day tourist visa. There seems to be some confusion over what is necessary for this visa, some people have read that you need to submit a letter of employment. We didn't bother and still got our visa. We added a copy of our Mongol Rally entry confirmation, mainly because I had a copy on my desk, and also because I feel it gives a bit more credence to our travel plans that are mentioned in the cover letter. Some quick facts:
- Cost: £42 per person (including signed for postage and consular fee)
- Visa Duration: 30 days
- Number of Entries: Single
- Visa Processing Time: 1 Week
- Place of Application and Nationalities: London and UK Citizens
- Application Date: 11th May 2015 (over 3 months in advance)
So how did we do it? Firstly here is our little check list of things you will need per person:
- Passport Photo 35 mm x 45 mm (x1)
- Printed Application Form (x1)
- Cover Letter (x1)
- B&W Photocopy of Main Passport Page (x1)
- Copy of Mongol Rally Entry Confirmation - Not Essential (x1)
- Copy of Hostel/Hotel Booking Confirmation (x1)
- Copy of Travel Insurance Certificate (x1)
Step 1 - The Hotel Booking
Having to book a hotel is a pain, especially when you are unsure about dates. Luckily there is a neat little trick that bypasses some of the uncertainty and costs you nothing. The wonderful booking.com allows you to book a hotel/hostel without paying a deposit. They also allow you to cancel your booking at no cost up to a few weeks before your booking starts! This is fantastic as it helps satisfy your visa criteria, allows you to have some flexibility, and costs absolutely nothing.
As we wanted a long visa, and not to have dates cut short (like our Tajikistan application), we opted to books hostels for 7 to 8 day stretches. We printed out the confirmation of booking email and placed one copy for each hotel in with our application.
Step 2 - The Application Form
The next step is to head on over to the Kazakhstan Embassy website and download the application form. This gives you a pdf document that you can fill in/convert if you have the software. I'm sure you can fill it in digitally, but I hand wrote mine to avoid messing up the formatting.


Above is my completed application form (with all my personal stuff crossed out). For our temporary address we just used our first hotel booking. We ignored (and left blank) section 24 about transit, I figured it wasn't relevant!


Above is my completed application form (with all my personal stuff crossed out). For our temporary address we just used our first hotel booking. We ignored (and left blank) section 24 about transit, I figured it wasn't relevant!
Step 3 - The Cover Letter
There are a couple of requirements for this cover letter, you need to include:
- Why you are travelling to Kazakhstan.
- Your itinerary for Kazakhstan (we did this day-by-day).
- The name of a hostel or hotel you will stay at (we booked these).
We also added a blurb about what we were doing and where we were going. Often with these kind of things it is better to give a little bit more information, for example we mentioned our jobs. We also signed this letter, just to make it seem a bit more official. Below is the letter we sent (with various personal stuff removed).


Step 4 - Sundries
Make sure you have a passport sized photo (45x35 mm) available and paper clip this to the application form. Make sure you have photocopied the main page of your passport. You also need to include a copy of your travel insurance certificate. This doesn't need to specifically mention Kazakhstan, and we actually 'created' our certificate as my policy is through my bank and they don't actually issue you with a certificate. For this visa we also sent a copy of our Mongol Rally registration, mainly because we had a spare copy.

We used the confirmation email that we received when we signed up. If you are applying for several people at once then it is a good idea to place the application forms and photocopies for each person in a separate plastic wallet.
Step 5 - Payment and Postage
You need to send a special delivery self addressed envelope with the application (so they can send your passports back), we also sent our application by special delivery. The embassy fee is paid by cheque (you can also pay by postal order, but this incurs an admin fee), made payable to "The Embassy of Kazakhstan".
Place all these items in a large envelope and post it off down to the embassy in London (we sent it special delivery). In total, for two visas, it cost us £84.30. Below is the full breakdown of costs:
Place all these items in a large envelope and post it off down to the embassy in London (we sent it special delivery). In total, for two visas, it cost us £84.30. Below is the full breakdown of costs:
- £70 payed by cheque to the embassy (for 2 tourist visas).
- £7.15 special delivery to send your passports and documents.
- £7.15 special delivery to have your passports sent back.
Step 6 - Sit Back and Wait
One week later we got our passports back with our shiny new visa sticker.
If this guide has been helpful (and saved you many many pounds compared with using a visa service), and you would like to say thank you then feel free to donate a couple of quid to our charity, Anthony Nolan, through our Just Giving link.
Wednesday 29 April 2015
Visas: Iran

As a British passport holder, this has to be one of the hardest/confusing visas to get. The Iranian Embassy in London has been closed since 2011. There was a glimmer of hope that diplomatic relations would improve significantly, however, this hasn't extended to the consular section of the embassy. That leaves us Brits with a quandary, how do we get a visa?
The general process for obtaining an Iranian visa goes as follows:
- Apply (and be approved) for a visa authorisation number using an agency who go through the MFA in Tehran.
- Go to the Iranian embassy with you authorisation number and all necessary paperwork.
Sounds simple, right?
Red Tape 1: Well unfortunately in order for a Brit to get an authorisation number they need to be part of a guided tour in Iran. This isn't necessarily a problem, more a financial burden. There are plenty of companies that can offer custom guide services, and if you have enough people in your group then the costs come down a lot per person. You will have to think up an itinerary so that does remove some of the sense of adventure, and you have to have accommodation booked for each night (usually through the guide).
Red Tape 2: Once you get your authorisation number you have 30 days to pick up your stamp. Once you have your stamp it is only valid for 90 days. So timings are important!!
Red Tape 3: The visa stamp needs to be collected in person. Now the definition of 'in person' seems to be quite loose. The Iranian Embassy in Frankfurt accepts the application from any person, just not through the post. This means if you have a friend who lives there, they can do it for you. If you're not lucky enough to know someone who lives in 'Mainhattan', then you can use a variety of courier services.
Where are we at? Well we've arranged a convoy, we're in contact with a tour guide, and we're just about to apply for the whole authorisation number malarky. As ever updates will come thick and fast!
Update: we arranged a convoy of 10 cars, all through the internet. Word of warning here, you will need to pay for the guide in cash at the border, make sure everybody in your convoy knows this so that you're not coming up short (even better get them to transfer you the money to avoid dropouts, it happens). Once you have your convoy organised you will need to send copies of passport identity pages and filled out visa forms to the tour guide company. They will arrange for the authorisation code to be generated (for British passport holders this takes a while, in our case two months). On receipt of the authorisation code you need to go to an Iranian embassy, we chose Frankfurt as we were not sure if the code would come in on time, and at least we were passing through Frankfurt. It will take the embassy a couple of days to process the visa, and you need to deliver and pick it up in person. If you are organised then get one person in your convoy to do a visa run (to cut down costs, assuming the person doing the visa run doesn't rack up a big bill, but that's another story).
Saturday 25 April 2015
Communication: Satellite Based Tracking
Something all teams will be mulling over is how do you communicate when you're in the middle of nowhere? We looked at all manner of options, particularly looking at international SIM cards, trying to find the cheapest. All the time, we were quietly contemplating GPS tracking. If only there was a device that could combine GPS tracking and some form of communication? Luckily there are a few emerging technologies that satisfy this need.
I narrowed down all the options to either a SPOT Gen3 or a DeLorme inReach SE. The SPOT is a well established device that offers frequent tracking and the ability to send pre-composed text messages. The inReach offers the ability to track and send custom messages, but here's the great part, you can receive text messages as well! Below is a table of comparison between four different GPS trackers.

As you can see the inReach SE performs favourably (the Explorer is the more expensive model). Therefore, my mind was made up, get an inReach SE! So over the last few months I've been (almost daily) searching on eBay for a second hand unit (I tried reaching out to DeLorme for sponsorship, but no luck there). Finally a unit came up at a reasonable price, and I didn't even hesitate to purchase. The device is fantastic, robustly built, smart design. I'll update with our live tracking map once that is all set up.

Note: a word on subscription plans. Like all satellite based communication you will need to pay a fair bit to actually use your device. The SPOT device offers year long contracts from around 130 USD. The inReach is more expensive (due to the messaging capabilities) but offers monthly contracts (perfect for short trips). If there are a few people in your team then it is worth going for the DeLorme expedition plan (approx 65 USD a month). This plan offers unlimited text messaging, meaning you can keep your blog updated daily and in detail. You can also message mobile phones and email addresses to let loved ones know you are safe and well, and receive unlimited responses.
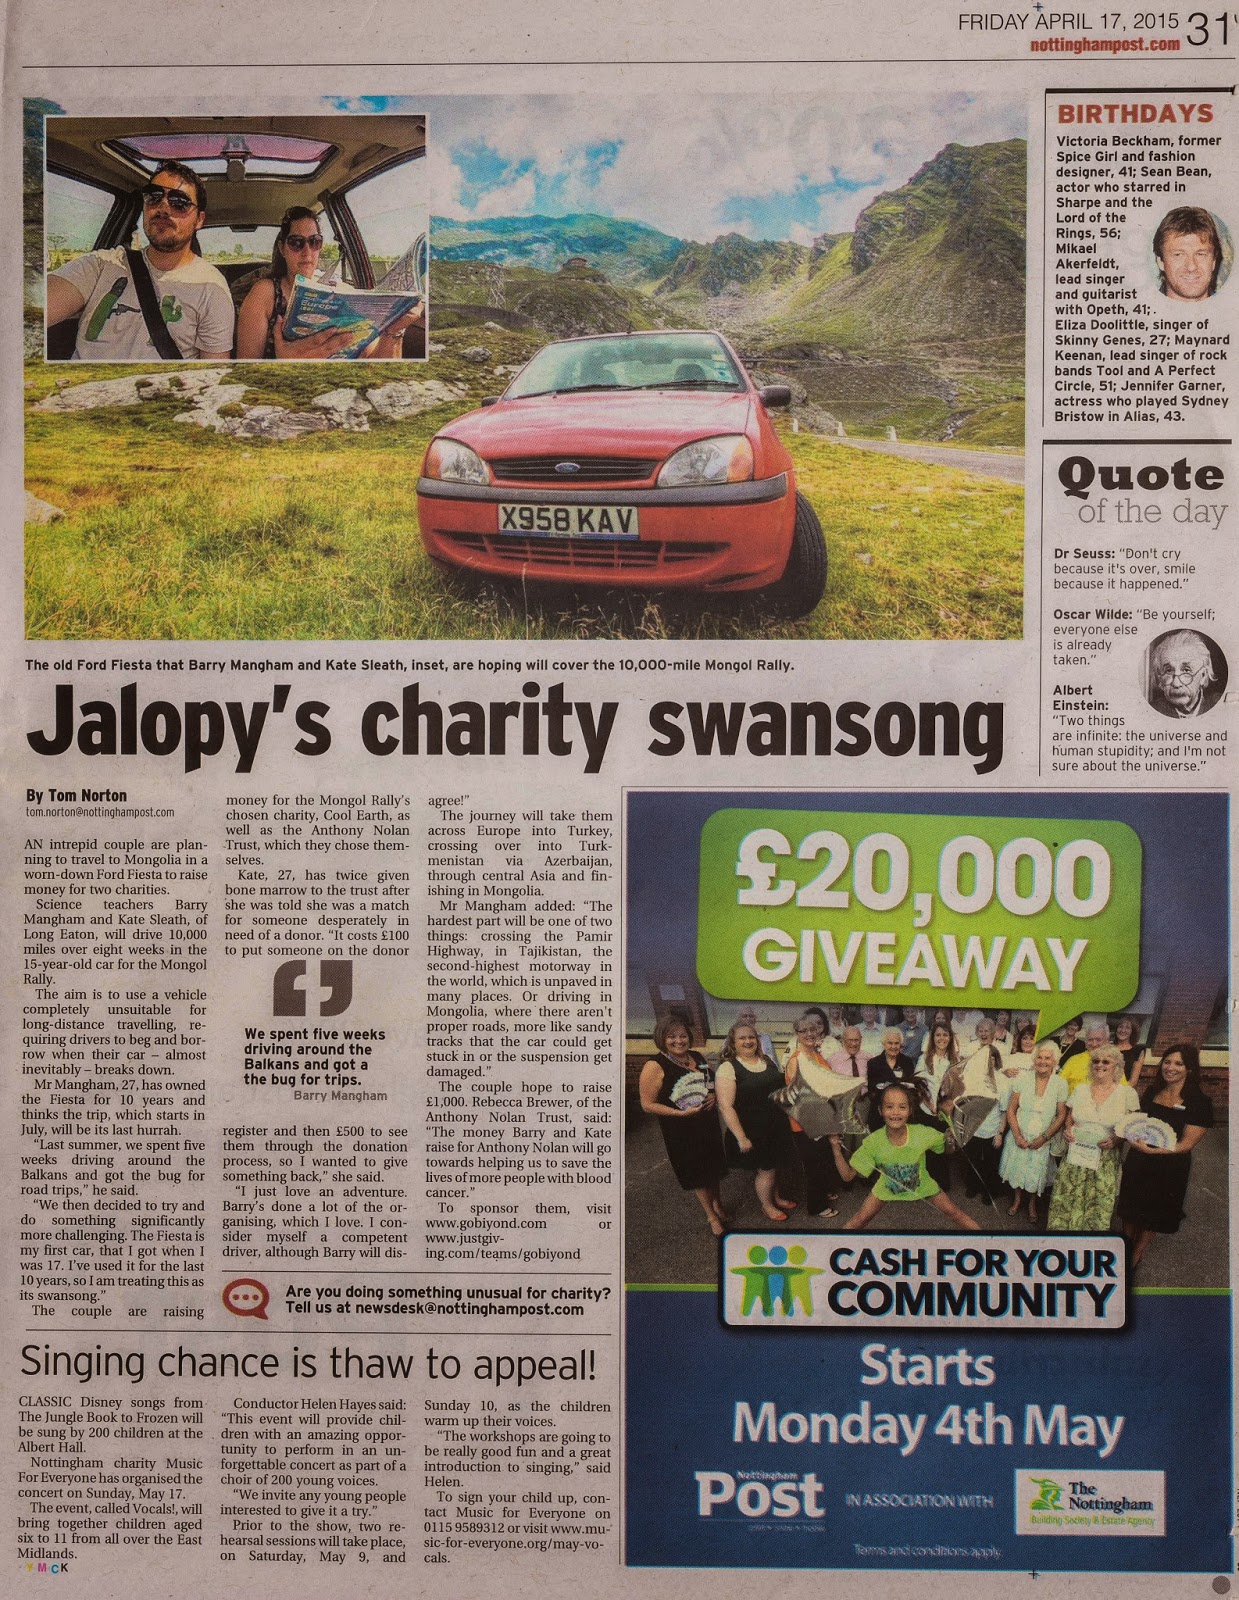
Saturday 18 April 2015
Making the news!
Here's a scan from the Nottingham Post, published 17th April 2015. A really well written article that will hopefully give us some much needed publicity! The article can also be found online here.

Sunday 5 April 2015
Visas: Kazakhstan (The Decision)

The Kazakhstan government passed a bill last year that allowed British passport holders to enter without requiring a visa. This was part of a trial scheme that unfortunately ends in July 2015. However, if the scheme is deemed successful then the trial will be extended. As of writing we still do not know if it will be extended or not. So that leaves us with two options:
Option 1
Pay for a tourist visa. At 35 GBP it's one of the cheaper ones to apply for. You do not need an LOI, or a hotel booking, and the visa will last for 30 days from your stated start date.
Option 2
Play the waiting game. If the trial is extended then you win, you do not need to do anything and you can just show up at the border and get a 15 day visa. If the trial does not get extended then you will have to pay for the tourist visa. Luckily reports suggest that the embassy turnaround time is pretty good (approximately five days), so you can afford to wait.
Update: we applied for our Kazakhstan visa mid-way through May. We couldn't wait any longer, and due to needing to do other visa applications we sent off for a 30 day visa. Full guide can be found here [link coming soon].
Our Verdict
If you need longer than 15 days in Kazakhstan then definitely apply for the tourist visa. If you anticipated spending less than 15 days then we would suggest waiting. There are plenty of other visa you can apply for in the meantime.Update: we applied for our Kazakhstan visa mid-way through May. We couldn't wait any longer, and due to needing to do other visa applications we sent off for a 30 day visa. Full guide can be found here [link coming soon].
Subscribe to:
Posts (Atom)